Sorting is one of the most common tools for data management. In Excel, you can sort your table by one or more columns, by ascending or descending order, or do a custom sort.
Before sorting a table
-
Make sure that there are no empty rows or columns in the table.
-
Get table headers into one row across the top.
-
Make sure there is at least one empty column between the table you want to sort, and other information on the worksheet not in that table.
Sort the table
-
Select a cell within the data.
-
Select Home > Sort & Filter.

Or, select Data > Sort.
-
Select an option:
-
Sort A to Z - sorts the selected column in an ascending order.
-
Sort Z to A - sorts the selected column in a descending order.
-
Custom Sort - sorts data in multiple columns by applying different sort criteria.
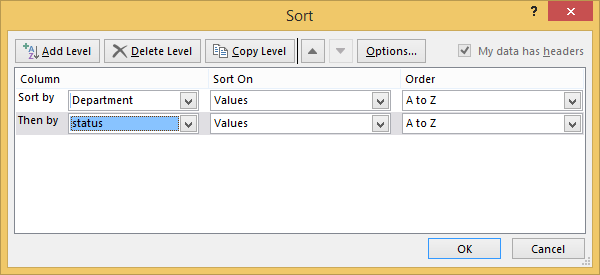
Here's how to do a custom sort:
-
Select Custom Sort.
-
Select Add Level.
-
For Column, select the column you want to Sort by from the drop-down, and then select the second column you Then by want to sort. For example, Sort by Department and Then by Status.
-
For Sort On, select Values.
-
For Order, select an option, like A to Z, Smallest to Largest, or Largest to Smallest.
-
For each additional column that you want to sort by, repeat steps 2-5.
Note: To delete a level, select Delete Level.
-
Check the My data has headers checkbox, if your data has a header row.
-
Select OK.
Source: Microsoft