Start your floor plan with a template that contains shapes for walls, doors, electrical outlets, and more.
Open a floor plan template
-
Select File > New.
-
Select Templates > Maps and Floor Plans.
-
Select the floor plan you want and select Create.
Change the drawing scale
-
Select Design.
-
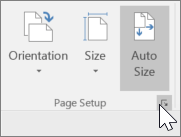
In the Page Setup group, select the More arrow.
-
Select Pre-defined scale, and choose a pre-defined architectural, metric, or engineering scale.
Tip: To use a custom drawing scale, select Custom Scale and enter your own scale ratio.
-
Select a page size.
-
Select OK.
Add floor plan shapes
-
Select the Walls, Doors, and Windows stencil.
-
Drag a room shape onto the drawing page.
-
To resize the room, drag the control handles.
-
Drag door and window shapes onto the wall of the room.
Note: Doors and windows rotate automatically to align with the room’s walls. They also acquire the wall’s thickness and move with the room.
-
Drag furnishings, equipment, and accessories onto the page from the Office Furniture, Office Equipment, and Office Accessories stencils.
Tip: Select More Shapes > Maps and Floor Plans > Building Plan to find more floor plan stencils.
Source: Microsoft