Send and collect responses options
You can copy a link to the form or quiz that you created and paste it into a shared area, send a QR-code for your form, embed the form or quiz directly into a blog or web page, or send the form link in an email. By clicking the link or scanning the QR code, people can respond to the form or quiz and submit their answers using their desktop or mobile web browser. You can also choose options to allow anyone to submit responses or restrict responses to only people within your organization.
Set authentication setting
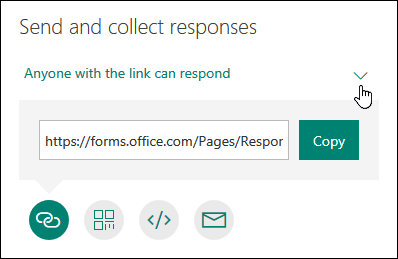
By default, only people within your organization can submit responses to your form or quiz. If you want to allow anyone to submit responses, click the drop-down Only people in my organization can respond and then click Anyone with the link can respond. You can toggle between these two settings by clicking the drop-down.
Note: Anyone with the link address will be able to see and complete your form or quiz. Be sure you're comfortable sharing the contents before changing this default option.
Note: Only people in my organization can respond setting is only available for Office 365 Education and Office 365 Commercial users. To access this setting, please sign in with your work or school account.
Send a form link to others

If you don’t have the email addresses of the people you want to view your form or quiz, or if you don’t want to use email for this purpose, you can easily copy a custom link that lets you send your form to others.
-
In Microsoft Forms, open the form you want to send.
-
Click Share.
-
Make sure the Link button is selected and then click Copy next to the text box that displays a form URL.
-
Copy and then paste this link wherever your intended audience can see and click it to gain access to your form or quiz (for example, a shared class notebook).
Send a form QR code

-
In Microsoft Forms, open the form you want to send.
-
Click Share.
-
Click the QR button to view a QR code for your form.
-
Click Download and then paste this link wherever your intended audience can scan it with a QR code scanner, such as a mobile device, to gain access to your form or quiz (for example, a shared class notebook).
Embed in a webpage

-
In Microsoft Forms, open the form you want to send.
-
Click Share.
-
Click the Embed button.
-
Click Copy next to the text box that displays the embed code and then type or paste this embed code into a blog or web page to embed your form within the document.
Invite others to view your form or quiz through email

-
In Microsoft Forms, open the form you want to send.
-
Click Share.
-
Click the Email button.
-
Your default email editing application opens. Note, you might see a security prompt letting you know an application is trying to open your email editor.
-
In the To box of your email editor, type the email addresses of the people you want to view your form. Microsoft Forms includes a brief note for the recipient in the email body so they have proper context for your invitation and a link to your form.
-
When you’re ready to send your form or quiz invitation, click Send.