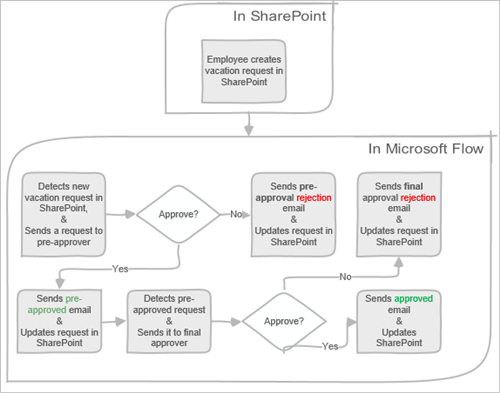
Detailed steps in the flow
The flow:
-
Starts when an employee creates vacation request in a SharePoint Online list.
-
Adds the vacation request to the approval center and then emails the request to the pre-approver.
-
Emails the pre-approval decision to the employee.
-
Updates the SharePoint Online list with the pre-approver's decision and comments.
Note: If the request is pre-approved, the flow continues with these steps:
-
Sends the request to the final approver.
-
Emails the final decision to the employee.
-
Updates the SharePoint list with the final decision.
This image summarizes the preceding steps:
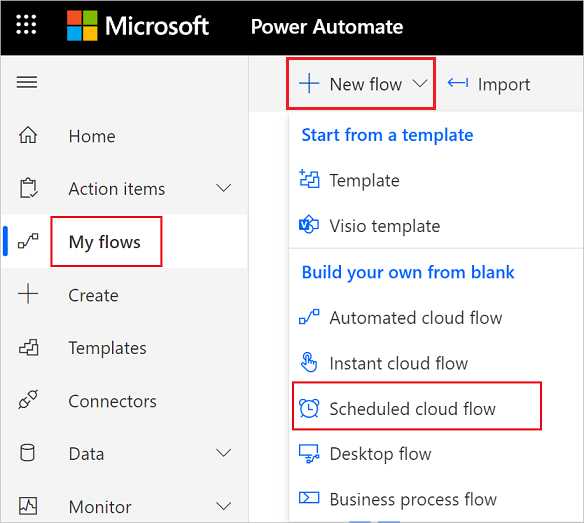
Create your flow from the blank template
-
Sign in to Microsoft Flow.

-
Select the My flows tab.

-
Select Create from blank.
-
Select the Create from blank button.
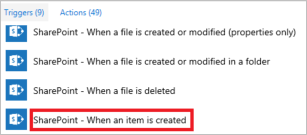
Add a trigger
-
Enter SharePoint into the search box.

-
Find, and then select the SharePoint - When an item is created trigger.
-
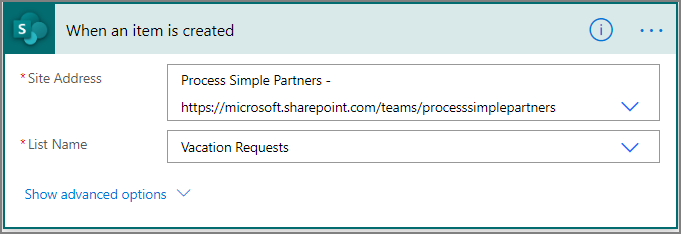
Select the Site Address and the List Name for the SharePoint list that your flow monitors for new items.
Get the manager for the person who created the vacation request
-
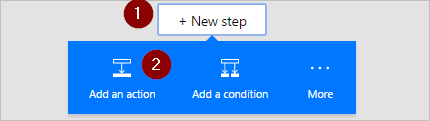
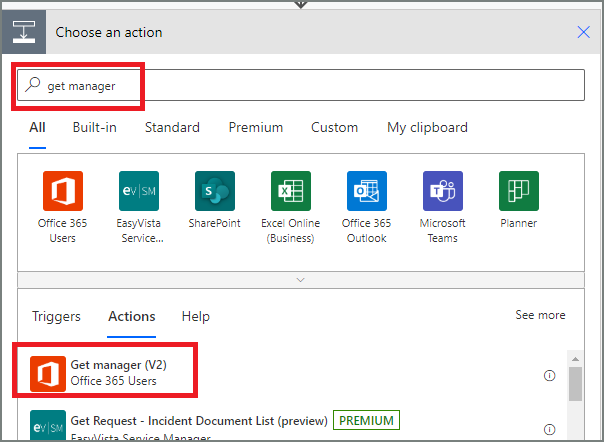
Select New step, and then select Add an action.
-
Enter get manager into the Choose an action search box.
-
Find, and then select the Office 365 Users - Get manager (V2) action.
-
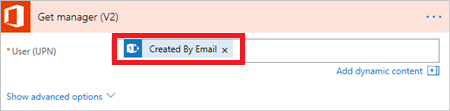
Insert the Created By Email token into the User (UPN) box on the Get manager card.
This action gets the manager for the person who created the vacation request in SharePoint.
-
Provide a name for your flow, and then select Create flow to save the work we've done so far.

Note
Select Update flow from the top of the screen periodically to save the changes to your flow.

After each save operation, select Edit flow from the top of the screen, and then continue making changes.
Add an approval action for pre-approvals
-
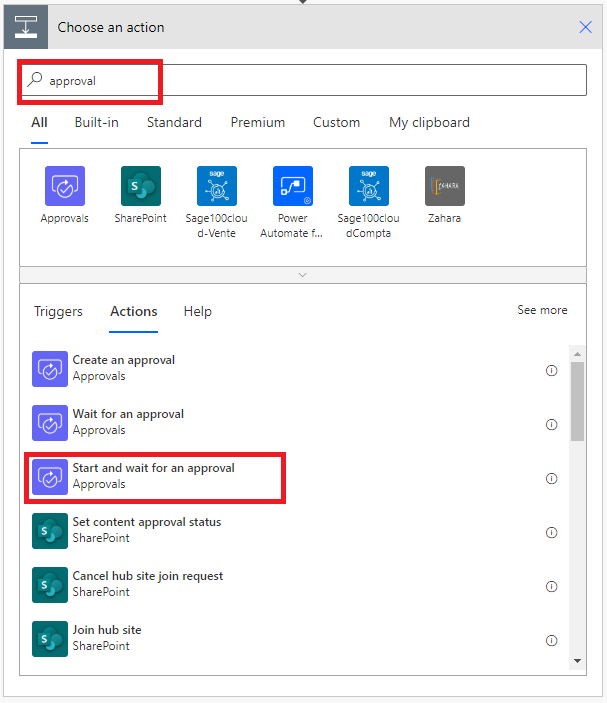
Select New step, and then select Add an action.
-
Enter approval into the Choose an action search box.

-
Select the Approvals - Start an approval action.
-
Configure the Start an approval card to suit your needs.
Note
The Title and Assigned To fields are required. You can use Markdown to format the Details field.
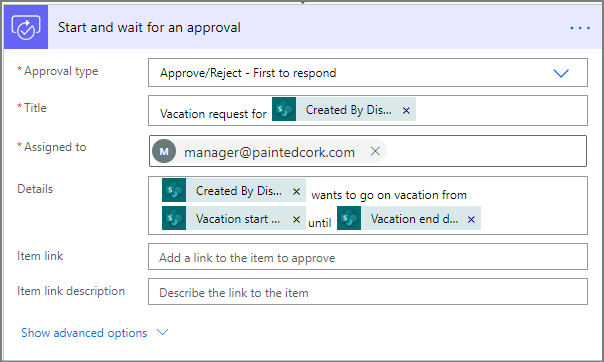
Note: This action sends the pre-approval request to the email address in the Assigned To box.
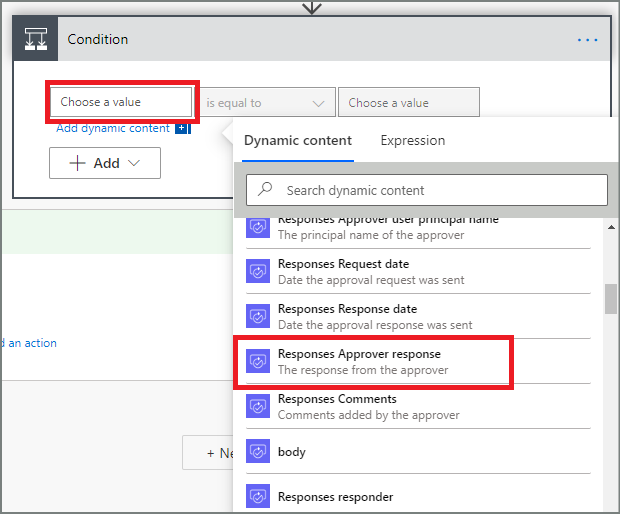
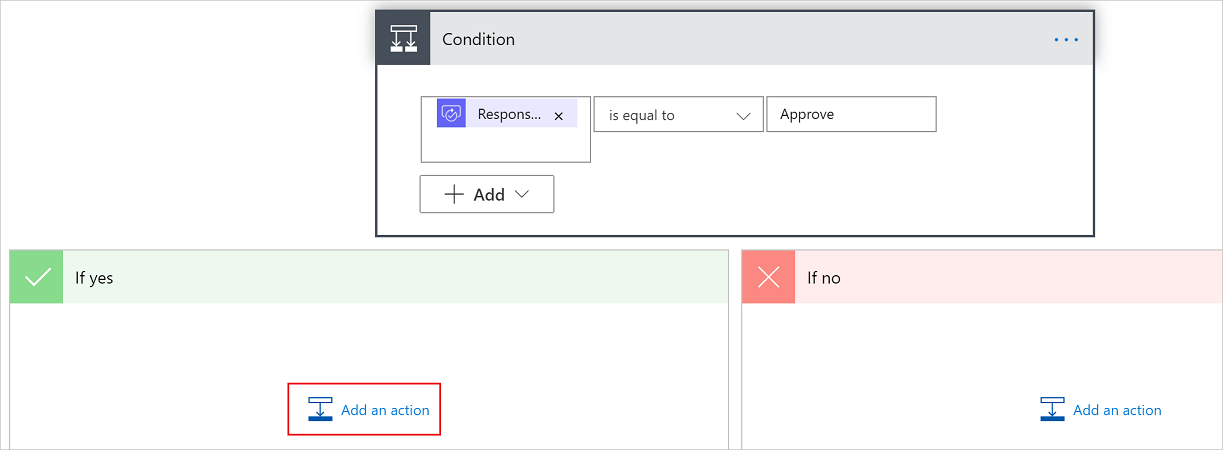
Add a condition
-
Select New step, and then select Add a condition.

-
Select the Object Name box, and then enter response into the search box on the Add dynamic content from the apps and services used in this flow card.
-
Select the Response token.
-
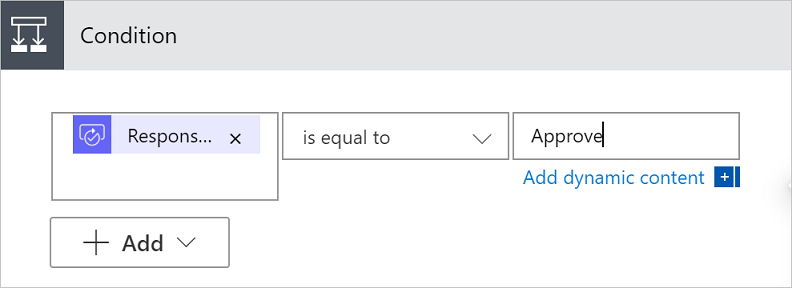
Select the Value box, and then enter Approve into the box.
Note
The valid responses to the Approvals - Start an approval action are "Approve" and "Reject". These responses are case-sensitive.
-
Your Condition card should now resemble this image:
Note
This condition checks the response from the Start an approval action.
Add an email action for pre-approvals
-
Select Add an action on the IF YES branch of the condition.
-
Enter send email into the search box on the Choose an action card.

-
Select the Office 365 Outlook - Send an email action.
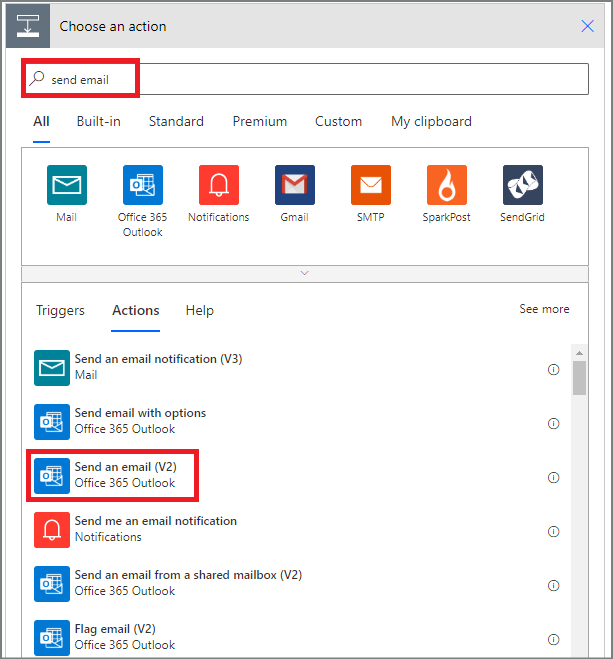
-
Configure the email card to suit your needs.
Note
To, Subject, and Body are required.
This card is a template for the email that is sent when the status of the vacation request changes.
Note: In the Body box on the Send an email card, use the Comments token from the Approvals - Start an approval action.
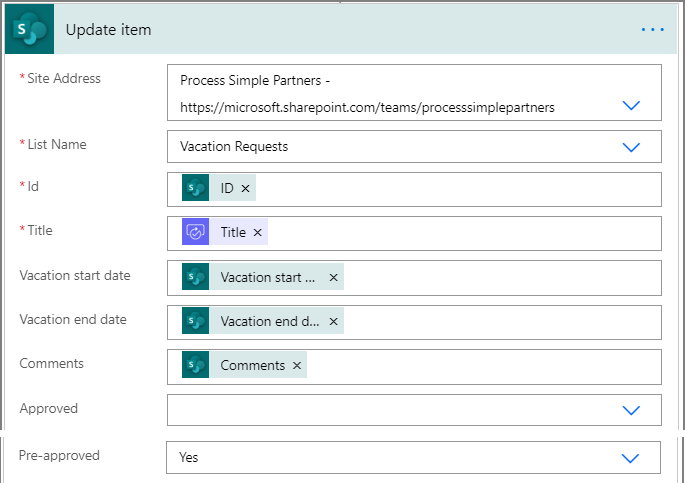
Add an update action for pre-approved requests
-
Select Add an action from the IF YES branch.
-
Enter update into the search box on the Choose an action card.

-
Select the SharePoint - Update item action.
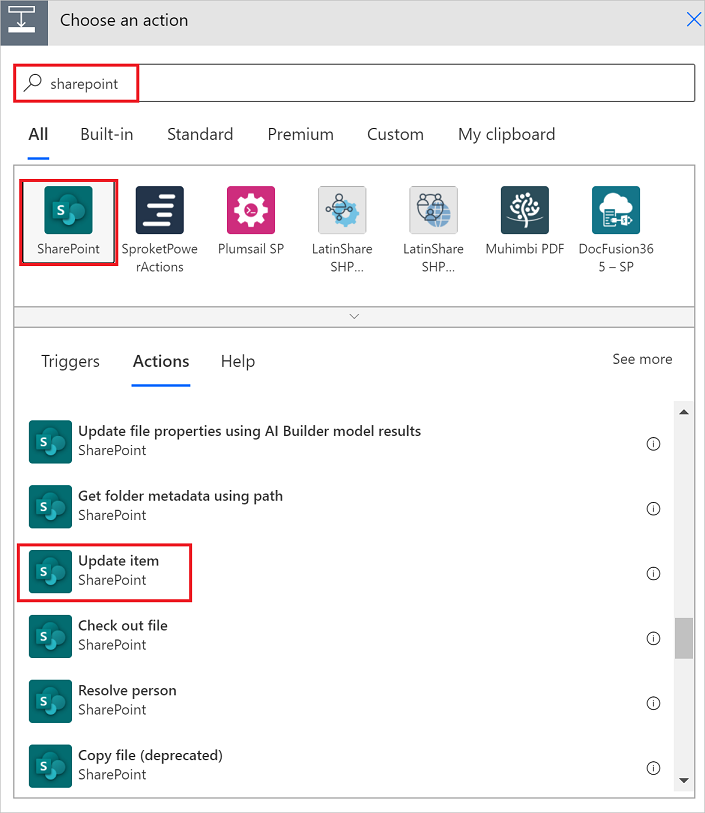
-
Configure the Update item card to suit your needs.
Get the pre-approver's manager
-
Use the Get the manager for the person who created the vacation request steps we did earlier to add, and then configure another Get manager action. This time we get the pre-approver's manager.
-
The Get manager 2 card should resemble this image when you're finished. Be sure to use the Email token from the Get manager category on the Add dynamic content from the apps and services used in this flow card.

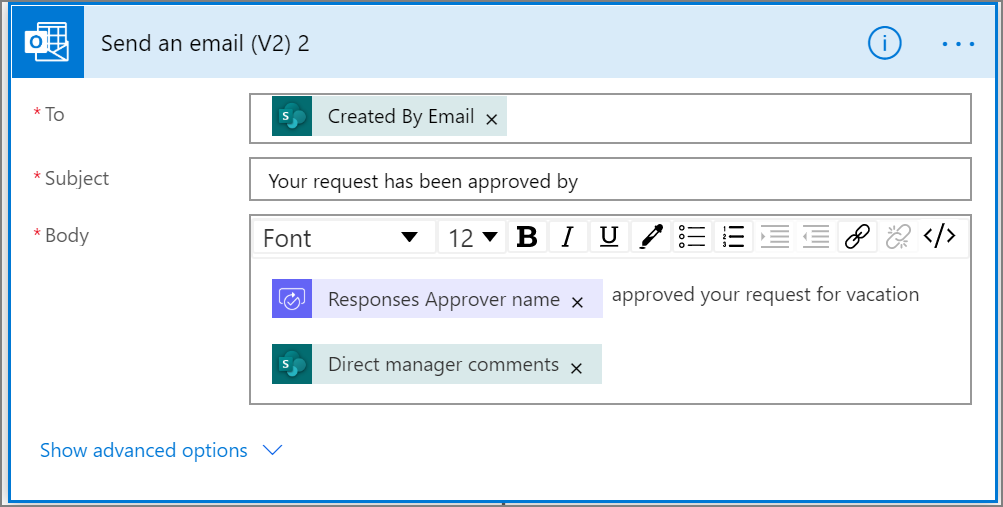
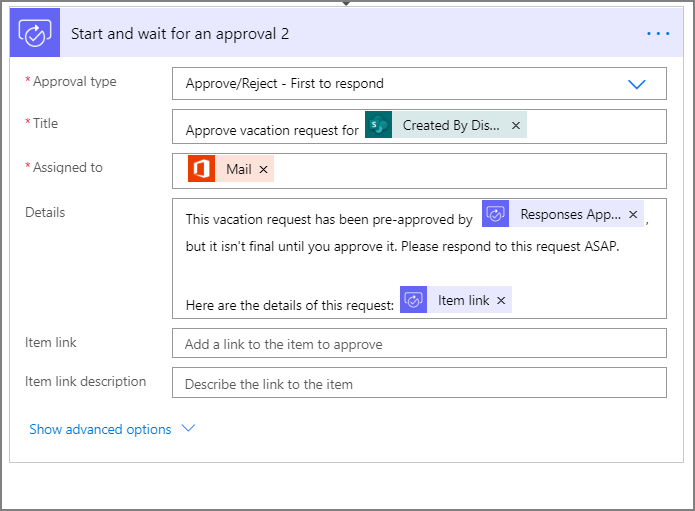
Add the final approval action
-
Use the add an approval action for pre-approvals steps we did earlier to add, and then configure another Start an approvalaction. This action sends an email request for final approval.
-
When you're done, the card should resemble this image:
Add the final approval condition
- Repeat the steps from add a condition to add, and then configure a Condition that checks the final approver's decision.
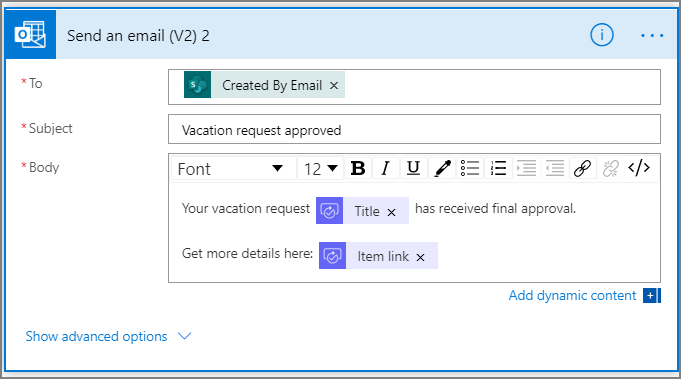
Send email with final approval
-
Use the steps from Add an email action for pre-approvals to add, and then configure an action that sends an email when vacation requests are approved.
-
When you're finished, your card should resemble this image:
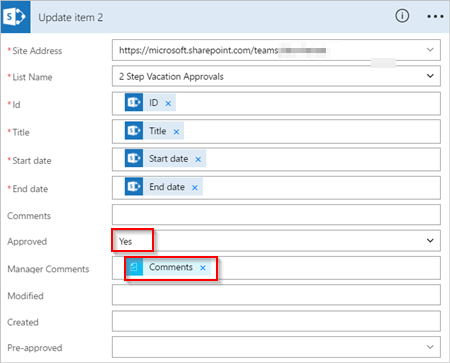
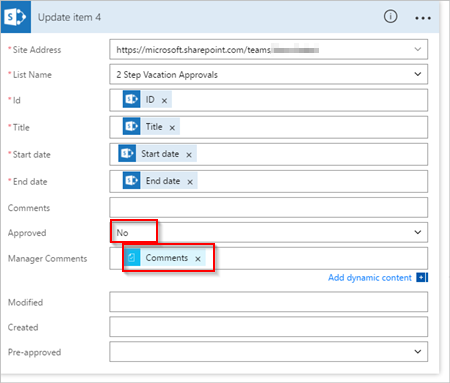
Update SharePoint with approval
-
Use the steps from Add an update action for pre-approved requests to add, and then configure an action that updates SharePoint when the vacation request is approved.
-
When you're finished, the card should resemble this image:
Send email with pre-approval rejection
-
Select Add an action on the IF NO, DO NOTHING branch.
-
Enter Send email into the search box of the Choose an action card.
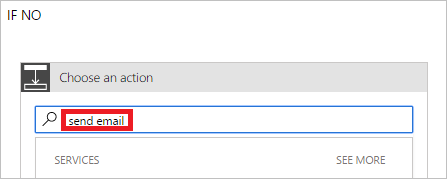
-
Select the Office 365 Outlook - Send an email action.
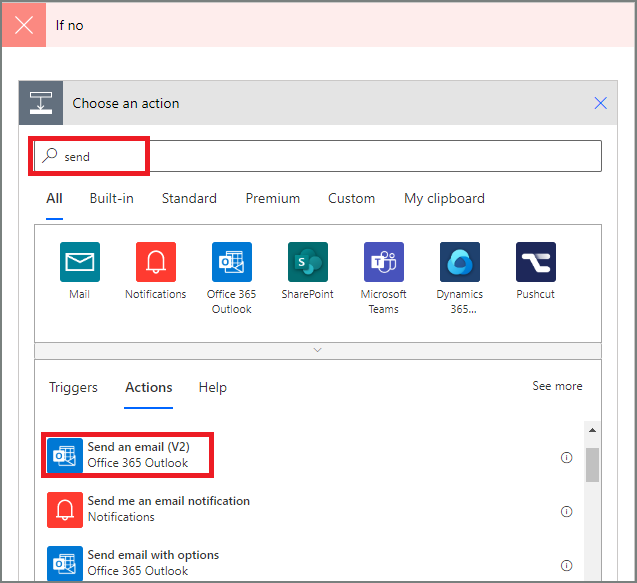
-
Configure the email card to suit your needs.
This card represents the template for the email that's sent when the status of vacation requests change.

Note: This action must be added to the IF NO, DO NOTHING branch below the Condition card.
Update SharePoint with pre-approval rejection
-
Select Add an action.

-
Enter update item into the search box on the Choose an action card.

-
Select the SharePoint - Update item action.
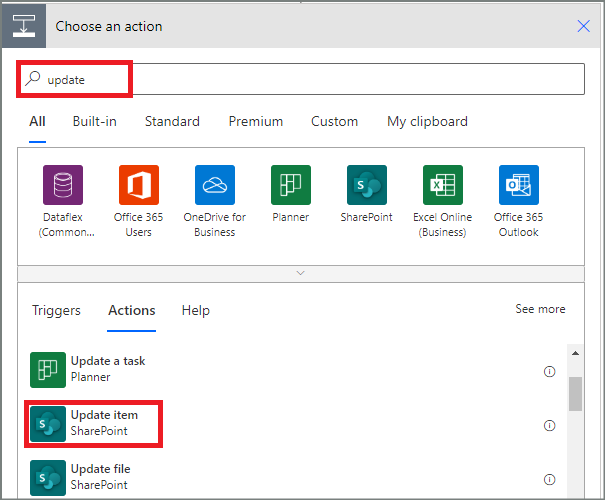
-
Configure the card to suit your needs.
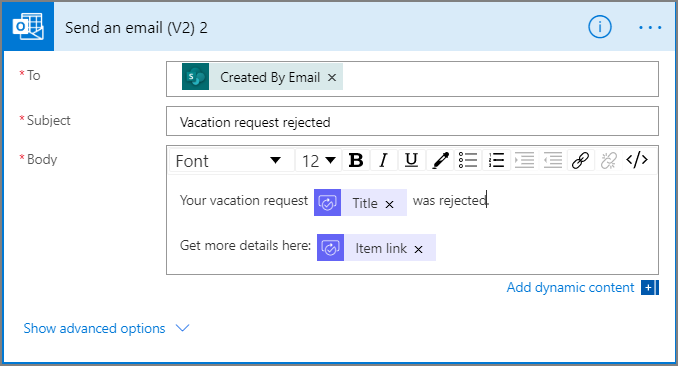
Send email with final rejection
-
Use the steps from Send email with pre-approval rejection to add, and then configure an action that sends an email when the vacation request is rejected by the final approver.
Note: This action must be added to the IF NO, DO NOTHING branch below the Condition 2 card.
-
When you're finished, the card should resemble this image:
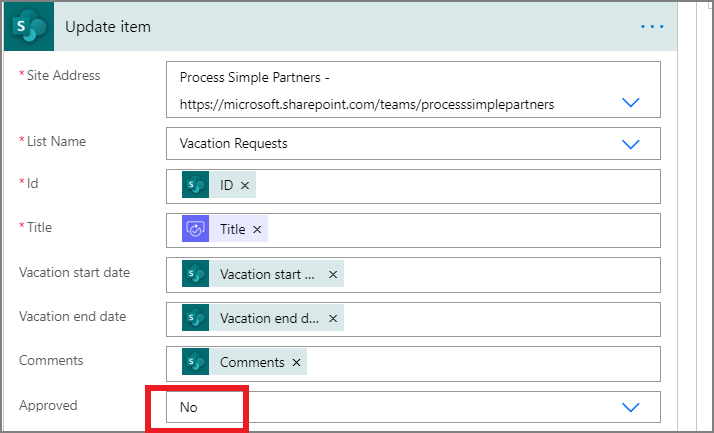
Update SharePoint with final rejection
-
Use the steps from Update SharePoint with pre-approval rejection to add, and then configure an action that updates SharePoint if the final approver rejects the vacation request.
-
When you're finished, the card should resemble this image:
-
Select Update flow to save the work we've done.
If you've followed along, your flow should resemble this image:
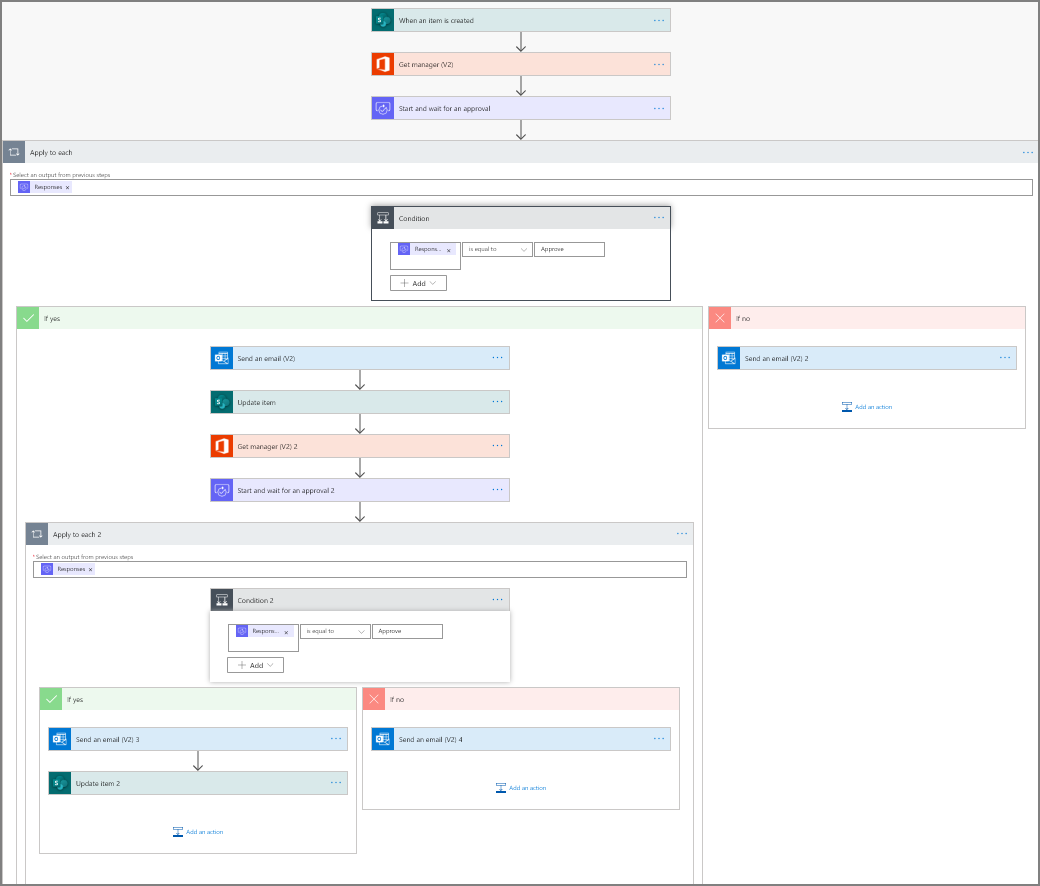
Now that we've created the flow, let's see it in action.
Request an approval
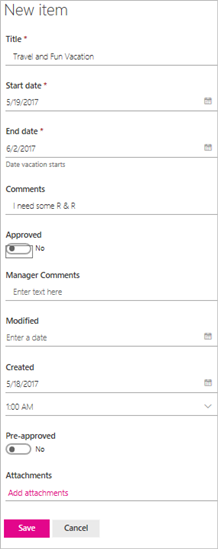
Create a vacation request in the SharePoint Online list you created earlier.
After you save this request, the flow triggers, and then:
- Creates a request in the approvals center.
- Sends an approval request email to the approvers.
Your request should resemble this image:
View pending approval requests
View all pending approval requests by following these steps:
-
Sign in to Microsoft Flow.
-
Select the Approvals tab.

-
Find all pending approval requests under Received requests.

Pre-approve a request
If you're an approver in an approval flow, you receive an email whenever someone creates a request. The approval request is also sent to the approvals center. You can then approve or reject requests from the email, the approvals center, or the Microsoft Flow app.
To approve a request:
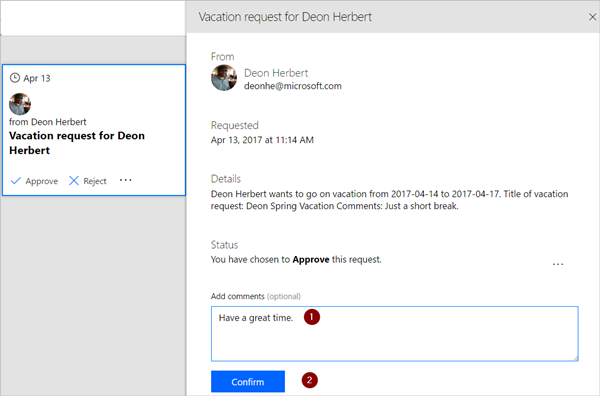
From email
-
Select Approve from the email you receive when an item is added to the SharePoint Online list.
Note: If you're using a mobile device with the Microsoft Flow app installed, the Microsoft Flow app launches, otherwise, the approvals center opens in your browser.

-
Enter a comment, and then select the Confirm button.

From the approvals center
-
Sign in to Microsoft Flow.
-
Select the Approvals tab.
-
Select Approve on the request you want to approve.

-
Add a note, and then select the Confirm button.
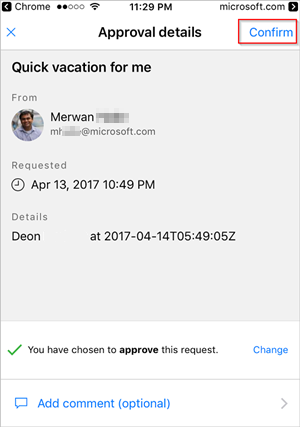
From the Microsoft Flow app
-
On your mobile phone with the Microsoft Flow app installed, select Approve from the request approval email.
-
Select Confirm in the upper right corner of the screen.
-
The success page shows, indicating that your approval has been recorded.
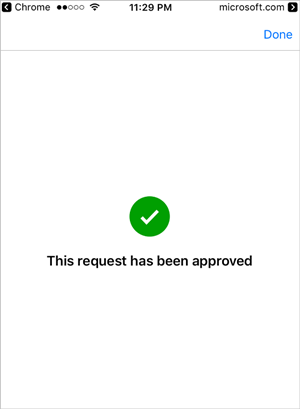
Note: The screens on Android, iOS and Windows Phone may differ slightly, however, the functionality is the same on all devices.
Reject a request
You can reject a request via email, the approvals center, or the Microsoft Flow app. To reject a request, follow the steps for approving a request, but select Reject, instead of Approve.
After you confirm your decision (rejection of the request), the flow runs the following steps:
- Sends an email to the person who requested vacation.
- Updates the SharePoint Online list with the decision, and the comments from the approver.